Monday, July 30, 2012

Makeover Monday - Revamp Your Gift Giving by Stocking a Gift Closet


As many of you know, we’ve designated the last week of every month as our No Spend Week and July is our No Spend Month in honor of celebrating Independence Day. During this time no funds are spent, with gas and living expenses (rent, electricity, phone, etc) being the only exceptions. As a result of meal planning and keeping a well stocked pantry, we previously did not include food in that exception list, but after couponing and seeing the savings deals that come abundant in July, we've decided to include food as one of the exceptions. Having a No Spend Week and Month is a way of stepping back to break free from mindless spending habits and encourages the concept of saving.

Every time the topic of our no spending period pops up, the same questions are asked..."How can you do that during times when a gift is needed?" We've done it by revamping our gift-giving and establishing a Gift Closet - a great concept started by my Grandmother that encourages abundant thinking. She was the queen of preparation and had a magic spot in her home where gift giving goodies were squirreled away.

Grandmother was a busy gal who worked full-time, volunteered extensively and had a massive social life (which included going back to college to get her degree in her 70's), but she loved to remember people on their special days. In order to do this with her demanding schedule, she stocked a Gift Closet with cards and gifts for any special occasion. Below are some examples of what you might find...

  • Linens - placemats, table cloths, napkins, hand towels
  • Glassware/Crystal - vases, candy dishes, bowls, coasters
  • Kitchenware - platters, bowls, canisters, napkin rings, salt and pepper shakers, serving sets
  • Stationery - pens, note sets, stationery sets, bookmarkers
  • Items for Little Ones - stuffed animals, toys, stickers, dolls, art supplies, clay, games, baby clothes, receiving blankets, rattles
  • Holiday Items - Anything holiday to celebrate the seasons
  • Wrapping - baskets, boxes, paper, tissue, bows, ribbon
  • Party Supplies - candles, balloons, streamers, Happy Birthday signs
  • Cards - Birthday, Christmas, Easter, Thanksgiving, Valentine's Day, Anniversary, Sympathy, Thank You, Thinking of You, Congratulations

Grandmother would collect items over the months when things would go on sale (she loved a good deal) and focused on items of quality with classic lines to ensure the design would always be in style. She would also keep people in mind. If she spotted something that a person might enjoy, she bought it right then instead of waiting until the last minute. The gift would then be wrapped and placed in the Gift Closet until the time of celebration.

TIP: Buy/make gifts and cards ahead of time to keep in your Gift Closet. Jot down a list of gifts and cards to be given for the year and keep it with you at all times. When you come across something that's on the list during regular shopping trips, it can be purchased ahead of time instead of waiting to the last minute. My mother had a great idea that works for her. She keeps a birthday card file with a folder for each month. In each folder she has a list of birthdays for that specific month, addresses, stamps and the cards she's collected over the year. Then on the first of the month she pulls the current folder, addresses the cards and sends them out! So simple and ensures no one is forgotten (:

Any gift of simple elegance is always appreciated and stocking a Gift Closet can help cover those times when we can't plan. Maybe a new neighbor moves in next door, a friend at work has a death in the family, you're invited to a dinner party but there's no time to get a hostess gift, an unexpected guest shows up for the holidays, your child has a birthday party the next day and the invitation arrived the night before.

By having gifts on hand to fit any occasion, you're always prepared when those little surprises pop up or for the ones that have been long planned. Much like a well stocked pantry, a well stocked Gift Closet will guarantee you have everything you need to celebrate those cherished moments and special days.

With Gratitude,

New to The Homesteading Cottage?   Don't miss a post and subscribe here...

Today we're joining The Homestead Barn Hop with The Homestead Revival, The Prairie Homestead and New Life on a Homestead - Come join in on the fun!

Friday, July 27, 2012

What to Do When You're Out of Your Element

Thank you for visiting The Homesteading Cottage. If you subscribe to our blog via RSS feed or email, you'll get helpful tips on simplicity, organization, all things DIY, natural cooking, entertaining, homesteading and emergency preparedness sent straight to you!


Many times when we face challenges, we seek comfort by surrounding ourselves with things that are familiar. It could be our designed spaces, projects, hobbies, old movies, work, relationships or even food...macaroni 'n' cheese please and don't forget a side of lasagna and chocolate cake!! Yes, comfort food is well known for its soothing affects, but inevitably that serving of temporary lusciousness is quickly developed into an ever so attractive chunk of fat on our thighs. {Sigh}

I've been going through that comfort mode craving, yet find it impossible to surround myself with those old familiar securities. Our business has gone through a bit of a change...some areas have grown quickly while others are in transition. The metal art side of the company has been put on hold so focus can be given to grow the transitional spots.

After our moving fiasco, new homesteading plans shifted when the home we were going to rent was sold.  We've yet to find another to fit the needed parameters, so we're staying in a beautiful cottage in the city owned by a dear friend.  We don't know how long we'll be here, therefore planting a garden or adding chickens is out of the question. The outside of the cottage is pretty much taken care of so we don't even need to mow, weed or get our hands dirty at all...not something I'm used to. The inside of the cottage is decorated and prepared for in such a way that it requires no tweaking on my part, which means my inner nesting urge is going untouched for the time being.

I'm so thankful for work that speaks to my soul, but as with many small indie companies, there's an ever present nitty-gritty work that needs constant tending if your business is going to continue to grow...and so I'm stuck in a sort of creative limbo. For the first time in my life I'm living and working in a space that requires no decor enhancement, no yard work of any kind nor continual maintenance that normally comes with day to day living.  Translation - No distractions. Hum...

A friend of mine thinks this is exactly what I need...grand design and all. She knows me all too well and has grown to understand the intricate crazy ball of interestingness that is my thought process (: I get so excited about the path of creative development that I take on too much, lose focus and end up putting off the nuts and bolts crucial for things to run smoothly behind the scenes.  Then I get frustrated when progression isn't happening as quickly as I had hoped and distraction ensues.  Sounds like my friend is right and I'm being offered a gift of dedicated focus (;

When we find ourselves out of our comfort zone, it's important to trust the flow. I find God has fascinating ways of limiting our distractions so the needed vital tasks of life can take center stage. That's where the magic happens.  We may not understand this jaunt of the journey, but if we fight the process, we'll just end up further off course. Trust something higher than yourself, embrace being out of your element and let go of the temporary comfort found by doing the familiar. Ask in faith for what you need and believe it will show up when the time is right.

So I've decided to trust and know that the path I'm on is leading to great things. For now I might not be gardening, painting, tending chickens or metalsmithing, but I'm sure God will nurture my soul by finding other ways for my hands to get dirty (:

“Therefore I tell you, whatever you ask for in prayer, believe that you have received it, and it will be yours.” Mark 11:24

With Gratitude


New to The Homesteading Cottage?   Don't miss a post and subscribe here...

Thursday, July 26, 2012

10 Steps to Easily Organize and Declutter Your Spaces

Thank you for visiting The Homesteading Cottage. If you subscribe to our blog via RSS feed or email, you'll get helpful tips on simplicity, organization, all things DIY, natural cooking, entertaining, homesteading and emergency preparedness sent straight to you!

 
I've always been a bit of a clutterbug and a piler - a sure sign you're a creative (:  Seeing inspires the soul.  If it's out of sight, I don't know it's there. But as the years have passed, the appreciation for an organized environment has taken over...a place for everything and everything in its place. I love neat spaces and thrive in them, but it has to be a visually pleasing one that offers function and style with easy access. If I have to work too hard to put something away, there's a chance it'll end up on the nearest table or desk.

Several years ago that orderly chi went out the window.  My Mother, Grandmother and I moved in together so we could provide the 24/hr care Grandmother needed.  That meant three households under one roof and the problem of too much stuff. We were in boxes for longer than I'd like to admit, we had very little storage and I never could quite reclaim that designed, ordered space I so cherished.

For the new transition, we purged more than I thought possible, hired an organizer to help get us out of those boxes and then combined features in the design to showcase the style appreciation of each person. It wasn't a quick or easy process due to the fact that we were three strong-willed women with our own definite ideas just trying to get used to the new living situation, but it did come over time.

Since then I've really enjoyed the process of ordering my surroundings, figuring out how to truly live in a space and finding neat ways to accentuate the positive no matter how small or large the home. I've been very blessed to be able to help others create havens to reflect their style/spirit and the first step is usually organization. So when a close friend was in much need of an overhaul for her closets, I jumped at the chance to lend a helping hand.

TIP: Organize with a friend if you can.  Emotional attachments to things always pop up and having another set of eyes can help provide perspective. Begin with smaller projects first so the excitement of one completed task will inspire the process to continue.

To start our closet overhaul, we established four piles (KEEP, DONATE, TRASH and MAYBE) and started with the smallest closet first. Remove everything out of the space you're trying to organize because once those items are placed in one of the four piles, the progress is immediately evident.

TIP: If you're working in a larger space, you might not have the room to move things to another location. The same affect can be achieved by shifting everything in that room to one side with the KEEP, DONATE, TRASH and MAYBE piles on the other.

Once the smallest closet was cleared out, we began asking the 3 Question Rule for everything...
    
     • Do I really love it? (is it a treasure)
     • Do I really use it? (has it been used within the last year)
     • Do I really need it? (sometimes we think we need something when we really don't)

I didn't let my organizing buddy think too much about each item...this was a 30-45 minute quick sort to categorize things, which is why I include a MAYBE pile. Once she began to see the space cleared, she felt really good about the progress. After the first sort, we revisited the KEEP and MAYBE piles again to challenge the idea of holding onto these things. Something kicked in (as it usually does) and she was thrilled to let go of even more! Yay!! I've been there and it's such a great feeling (:

After the sort was completed, she was able to evaluate what she had and then purchased plastic storage boxes accordingly. Chalkboard labels add a versatile finishing touch for at-a-glance organization. If the contents of your container change, simply wipe and relabel!

TIP: Wait to purchase supplies until after the sorting process. There's always a temptation to gather supplies first before the organizing process begins. This usually leads to not having exactly what's needed for the job which in turn, pushes the task to be completed yet another day. Translation = everything gets shoved back in the closet or junk room.

My friend then grouped like pieces together and placed them in their corresponding bins and baskets. She even found out-of-place items in other parts of her home and was able to add those to their new prepared for space! Once things have a place, the order grows (:   By the end of the day she...

  • cleared out one closet and part of another
  • had a huge giveaway pile for charity
  • now has a place for items that were being stored in other parts of the home, therefore clearing out other areas too
  • was able to move two vacuum cleaners into the closet so they're out of sight - they were previously relegated to the bay window area for all to see
  • is able to see stored items at-a-glance for easy access
  • is only using half of the closet that was previously full

The organizing session was such a success, we decluttered two more huge walk-in closets the next weekend! She was able to let go of even more "stuff" and found a few things that had been missing for years (: She says she still opens the closet doors just to look at the open, orderly space. It really is amazing how a clean and organized closet can make you feel (:

If you're ready to organize, here are the 10 steps to get you started:
  1. Ask a friend for their eyes of perspective
  2. Choose a small area to tackle first
  3. Create four sorting piles...KEEP, DONATE, TRASH, MAYBE
  4. Unload the spot you're going to organize and take everything to another location, even if it's just to the other side of the room
  5. Do a quick sort (usually 30-45 minutes) and place items in the four piles
  6. Revisit the MAYBE and KEEP piles
  7. Evaluate your KEEP pile to determine what storage containers will be needed
  8. Group like objects together and place into storage containers
  9. Add labels to bins and baskets for at-a-glance organization
  10. Relocate items from other areas of the home to their new organized spot
Do you have a passion for organizing? What are some tips you've learned along the way?

With Gratitude,


New to The Homesteading Cottage?   Don't miss a post and subscribe here...

Today we're joining A Rural Journal, Katherine's Corner, Live Laugh Rowe,

Monday, July 23, 2012

Makeover Monday - How to Stock a Healthy Pantry

If you're pantry is full of junk and processed foods it might be time for a makeover (:  Keeping a well stocked natural pantry is a blessing when unexpected company arrives, but it can also provide the necessary nutrition if an emergency hits. This emergency could be a power outage, illness or even a job loss. The simple act of keeping the cupboards stocked with healthy staples means your household will be taken care of even during times of stress.

My Grandmother was a preparer and had it down to a skillful science. She always had extra items on hand to share with loved ones or those in need. We never left her home without a bag of groceries or extra helpings from our dinners together. As the years pass by, I'm appreciating Grandmother's knack for planning ahead more and more.

Recently terms like preparedness and stockpiling have been bandied about. I think when most people hear the term stockpiling they either think of some seclusionist in the hills getting ready for the end of the world or the extreme couponing show where "savvy" shoppers proudly show off their tons of toiletries, noodles and canned goods.

I was introduced to the stockpiling concept over 20 years ago by my best friend in high school. Self reliance was very important to her family and so they maintained a year's worth of food to assure their viability during troubled times. I thought it a little strange that the guest room had been converted into a pantry, but I now grasp the enormous benefits of such an undertaking. We may not have a stockpile room dedicated to a year's worth of food, but we're working our way there (:

With the changing economy and a focus on self-sufficiency, the drive to create a long term source of staples is ever-present. Homesteading is all about self-sufficiency and our goal is to have a spot of land with fruit and nut trees, gardens, chickens and goats, but our current location is a temporary one. We aren't sure how long we'll be here, therefore growing our own food has been put on hold. So what does a homesteader at heart to do when she's stuck in the city without a garden? She grows a healthy pantry (:

I wrote a recent post about giving our budget a makeover by using coupons. Today I'd like to show you how to makeover your pantry by including healthy basics that can be used to create an abundance of nutritious meals. If it's processed, it doesn't make the cut. I find that a product with an ingredient list of words I can't pronounce, much less spell, has no business being in the ol' tummy (:

Focus on whole foods, buy organic when possible (if you don't have a garden or go to the farmer's market), go crazy with a dehydrator and learn the art of canning/fermenting foods. If canning and dehydrating aren't in the cards for you, that's okay...there are lots of great options on the grocery store shelves for those who don't.

We stick with whole grains, gluten-free flours and meals, keep refined sugars out and make all of our dressings and sauces. Below is a list of our pantry staples and ones we enjoy on a regular basis...

Grains - brown rice, millet, quinoa (millet and quinoa are actually seeds not grains, but we use them in place of other grains)

Ground Meals & Flours - cornmeal, flaxseed meal, coconut flour, almond flour

Baking Goods - baking soda, cornstarch, arrowroot, cream of tartar, cocoa powder

Oils, Vinegars & Condiments - extra virgin olive oil, coconut oil, fermented ketchup, spicy mustard, raw apple cider vinegar, white vinegar, balsamic vinegar, red wine vinegar

Root Veggies - Red potatoes, gold/white potatoes, sweet potatoes, onions, shallots, garlic, ginger (we always peel and freeze our garlic and ginger for extra long storage life)

Dried Fruit - goji berries, elderberries, prunes, dates, figs, raisins, blueberries, cranberries, banana chips, apples, apricots, cherries, sun dried tomatoes

Nuts & Seeds - almonds, walnuts, pecans, flaxseeds, millet, quinoa, pepitas (pumpkin seeds), pine nuts, sesame seeds, sunflower seeds, chia seeds

Canned Goods - crushed and diced tomatoes, tomato paste, canned pumpkin, beef and chicken broth (we make our own and store it in the freezer, but there are some great organic boxed options), coconut milk (we prefer to make our own, but the canned milk makes great whipped topping in a pinch), almond butter, beans (canned or dried), black and green olives, sauerkraut, pickles, pepperoncinis, roasted red peppers, tuna, wild salmon. 

**We're learning so much about the importance of relying on fermented foods instead of traditional canned goods, but still have a bit more studying in this area...we'll talk more about that in another post**

Natural Sweeteners - raw honey, pure maple syrup, rapadura/sucanat, stevia

Teas - black, green, red, hibiscus, mint

Misc - popcorn, raw cacao nibs, coconut flakes, jerky, vanilla, vanilla beans, brown rice pasta, Nori seaweed sheets

Herbs and Spices - allspice (whole and ground), bay leaves, basil, caraway seeds, cayenne pepper, celtic sea salt/kosher salt, cinnamon sticks, chili powder, chipotle, cilantro, cloves, coriander, crushed red pepper, cumin, dill, dry mustard, dried shallots, fennel seeds, garlic powder, marjoram, nutmeg, onion powder, oregano, paprika, pepper, peppermint, poppyseeds, rosemary, sage, tarragon, thyme, turmeric

Storing all of these goodies can be a fun process too (: I like to put things like grains, meals, beans, teas, jerky, dried fruit, nuts (we store the bulk of the nuts in the freezer for longer storage life) and pastas in glass jars. Spices are stored in our magnetic spice tins, root veggies are always perched in baskets for air flow (have you ever smelled a rotten potato left in a plastic bag? Yikes!!) and we love to repurpose glass jars and bottles after peppers, pickles, vinegars and oils have been used. Slap a chalkboard label on and it turns into something special (:

If you'd like to overhaul your pantry with a makeover, start small. You may currently have a lot of junk on your shelves, but don't feel like everything needs to be thrown out at once. Use what you have, replace it with a healthy option and then stock up when the sales are rock bottom. Before you know it you're pantry will become a healthy stockpile that will feed your family for months to come. Still need more help? "Urban Pantry - Tips and Recipes for a Thrifty, Sustainable and Seasonal Kitchen" by Amy Pennington is a great place to start.

With Gratitude,


New to The Homesteading Cottage?   Don't miss a post and subscribe here...

We're joining the Homestead Barnhop #71 today...join us in the fun!

Wednesday, July 18, 2012

Tips on Freezing Orange Juice

Thank you for visiting The Homesteading Cottage. If you subscribe to our blog via RSS feed or email, you'll get helpful tips on simplicity, organization, all things DIY, natural cooking, entertaining, homesteading and emergency preparedness sent straight to you!

We love our local grocery store! Not only are the prices great, but they are wonderful about giving free products to returning customers. At the bottom of each receipt we're given a code to use to fill out an online survey about our shopping experience...was the store clean, were we greeted upon entering and leaving, were we able to find what we needed, etc.

With every completed survey, we're given a coupon for free product and this month orange juice was the featured freebie. At the time, this gallon of orange goodness was $4.99 and we were able to collect quite a few coupons. That meant our fridge was filled to the brim with oj in a home where we don't normally drink a lot of the stuff.

Recently in our couponing post, I talked about taking advantage of free product opportunities even if it's not something you use a lot. We love orange juice, but it can be expensive so we focus on water, tea and cranberry juice for most of our drinking needs. We were so excited when the new oj coupons came out, but I knew we couldn't drink the majority of that juice before it expired. The solution? Freezing!

We already freeze broth, veggies, fruit, garlic, herbs and ginger...why not juice?! The neat thing about freezing orange juice in ice cube trays is that the smaller amounts can be used quite easily. Whenever you need juice for a drink, simply place the frozen cubes in a pitcher and the next day you'll have fresh oj for breakfast!

Our favorite thing is to add a few cubes into morning smoothies. It takes the place of ice so the smoothie isn't watered down. Another great idea is to pop several cubes in the food processor or blender along with a tablespoon of olive oil, fresh ginger, fresh garlic, a touch of honey, salt and pepper. It makes an amazing sauce to pour over chicken breasts cooked in the oven. Yum!

For a twist on a healthy summer treat, put popsicle sticks into the cubes when they're almost frozen. Once they're solid, the cubes turn into mini orange popsicles for the kids (the adults in our home love them too!). A simple dessert that's natural and so much better than processed sugar popsicles.

To make our orange juice ice cubes we used 9 ice trays and did the following...

1. Poured orange juice into ice cube trays

2. We left them in the freezer overnight and then dumped the cubes into a glass bowl to make it easier to fill the bags

3. Filled Ziploc bags with oj cubes and stored them in the freezer for future use.

It feels like it's taken forever to freeze all that juice and to be honest, we still have quite a few more gallons waiting to be transformed into little cubes of frozen magic. Just like stocking a healthy pantry, adding to your freezer can be well worth all the hard work for months to come. Keep a look out for a new post on How to Stock a Healthy Freezer soon!

So what goodies are lurking in your freezer? What are your favorite stocked freezer items and how do you freeze them? We'd love to know (;

With Gratitude,

New to The Homesteading Cottage?   Don't miss a post and subscribe here...

Monday, July 16, 2012

Makeover Monday - Makeover your Budget with Extreme Couponing

Thank you for visiting The Homesteading Cottage. If you subscribe to our blog via RSS feed or email, you'll get helpful tips on simplicity, organization, all things DIY, natural cooking, entertaining, homesteading and emergency preparedness sent straight to you!

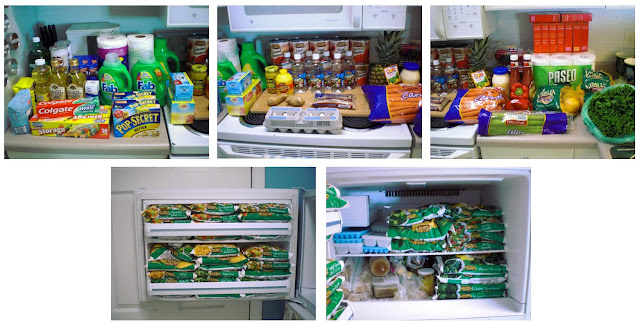
Well, maybe not EXTREME couponing...just my version (: About a year ago I wanted to find ways to maximize our budget.  We had two goals...1) To reduce our grocery spending and 2) To begin adding extra items to our pantry to prepare for the unexpected/time of emergency.  I began reading tons of stories of families overhauling their spending by using coupons and decided to give it a try.  Last year was my first attempt after winning a $250 grocery store gift card and I was amazed at how that $250 gift turned into over $500 worth of product by using coupons. The photo above shows just some of the items we were able to buy.  (You'll have to forgive the messy freezer...the frozen veggies took up most of the space and the rest was filled with jars of tallow, chicken fat, frozen broth cubes and ice trays (:  I'm so looking forward to the day when we get an additional freezer!

I started my couponing journey by studying store flyers and collecting coupons from papers and online sites. It was a tad overwhelming at times because I really had no idea what I was doing (; I always thought couponing would never work for us.  We didn't buy a lot of processed food or name brand items and we shopped frugally...or so I thought.

We were already receiving free items by taking surveys about our shopping experience (found at the end or back of your shopping receipt) and each month our local natural food store also offered coupons for free products when purchasing $5 or more. Other than that I didn't really understand how the couponing process could work to get the price down for items we enjoyed using...organic, whole food, fresh foods, etc.

Turns out my shopping strategy was all wrong. I only searched for coupons on products that we currently needed instead of ones with the greatest possible savings. If you're buying items only when you need them, then you're operating behind the game. I soon learned about saving coupons even when they might not used, buying local and in season, keeping an eye out for sales and special promos and then buying rock bottom...all of which create some pretty fantastic savings. 

Example...our local store's brand of 16 oz frozen veggies are normally $1.78 per bag. This includes corn, spinach, turnip and collard greens, broccoli, mixed veggies, okra and green beans. Sometimes they're on sale for $1.48 or less, but every so often my favorite low price of $1 appears. That's a savings of $.78 per bag and is the rock bottom price for this item. That's when I buy. I don't purchase a couple for the week, I buy at least 20-30 at a time and stock up for the months ahead when that $1 hits.  We didn't use a coupon for this particular purchase and didn't need to because we paid attention to the cycle of the sale.

Another example...We LOVE Earthbound Farm and always try to keep our eyes out for their coupons when available. Their 5 oz lettuce boxes go for $3.99 each. Sometimes they're on sale for $3.50 or $2.99, but every so often a BOGO sale appears which makes them around $2.00 each. Sounds great, eh? But what if you planned ahead, had a $.75 coupon (which they currently do) and your grocery store doubles coupons? That means you could get that same $3.99 box for $.50!! That's rock bottom.

This was a recent sale for us so we purchased all they had and even got a rain check for 8 more because they ran out. We bought mostly spinach since we can freeze it and the rest were salad greens that we'll be eating on for a while (; Those 18 boxes of organic greens cost us $9.00 compared to paying the full $3.99 price for each one which would have been $71.82. That's a savings of $62.82 by buying low or rock bottom.

TIP: When buying lots of fresh greens, wash them when you get home, place a paper towel in the bottom of the box, pile the greens back in, place another paper towel on top and those greens will keep for even longer!

We're gluten-free, prefer organic and like to stay away from processed food, but when “fun junk” is free or rock bottom, we get it anyway for parties, the holidays, special celebrations or to share with others. It gives the opportunity of donating to charity or to keep them on hand for family and friends who might enjoy these little treats once in a while. You’ll notice a section at the bottom of our list below full of junk. We don’t normally get this much, but there were a lot of freebies and deals for the holiday.

Here's the perfect example that happened recently...My mother was shopping and happened to have coupons to cover the cost of a particular brand of soda which was on sale. Soda's not her thing, but she always has coupons on hand in case of a good buy/freebie. During her shopping spree she noticed a family discussing items for their party as they tried to figure out if soda could be afforded to add to the list. Mom felt a tug to give them her coupons and they were so thankful for the gesture. Couponing allows the opportunity to share with others even if you don't have a cent to spare (:

We like to keep our household and food budget in the range of $250-$275 which includes food, cleaning products, personal care, supplements, pet care and food storage (emergency prep). I'm trying to get this down even further, which will happen once we're able to put in a garden and a chicken coop (maybe even goats), but for now we're using coupons to trim our homesteading budget as much as possible.

Since we have a set amount, I purchase throughout the month which allows me to catch as many deals as possible.  Once that money is spent, we're done.  Spreading the shopping throughout the month makes it easier on the cashiers (using coupons takes more time for them), it's nicer to the customers in line behind you, it gives you more savings opportunities since the sales change each week and who really wants to load up a cart full of groceries once a month like those on that extreme couponing show (;

Below is the an example of a month's purchases. The total cost before coupons was $896.65. With coupons, free deals, great sales, brand challenges (buy the name brand and get the store brand free), buying rock bottom and meal deals (buy this and these items are free), we only paid $274.38. That’s a savings of just over 69%. I left out a chunk of items when I first posted, so I updated the list to give you an idea of what is possible.

Household / Pet
  • 2 Bags of Core Wellness Grain-Free Dog food
  • 1 bottle of natural enzyme supplements
  • 1 bottle of raw green supplements
  • 1 bottle of raw whole food vitamin supplements
  • 3 Fab laundry detergents (2 free)
  • 2 Purex laundry detergents (free)
  • 1 large bottle of Suave shampoo
  • 1 large bottle of Suave conditioner
  • 1 bottle of Suave Mousse 
  • 15 bottles of Suave body wash ($.38 each with sale + doubled coupons)
  • 3 bars of natural castile soap (used to make laundry detergent, liquid hand soap and shampoo)
  • 63 boxes of tissue (free)
  • 44 Double Rolls of bathroom tissue (20 free with sale + doubled coupons)
  • 20 tubes of toothpaste (free)

Meat

  • 2 free range natural chickens - 5 lbs each (free)
  • 1 pound of hormone free ground chuck
  • 5 pounds of spicy sausage ($.60 a pound with sale + double coupon)
  • 5 cans of tuna
  • 1 pack sliced ham (10 oz)
  • 1 pack sliced turkey (10 oz) - (free)
  • 2 lbs smoked turkey sausage (1 lb free)

Pantry Staples

  • 2 cans of organic baked beans
  • 4 cans of diced tomatoes
  • 1 jar of organic peach salsa
  • 1 jar of garlic dill pickles
  • 4 bottles of natural ketchup (2 free)
  • 2 jars of 30 oz Olive Oil Mayo (free with sale + coupon)
  • 1 bottle of dijon mustard (free with sale + coupon)
  • 1 large bottle of olive oil
  • 1 large bottle of Bragg's Organic Apple Cider Vinegar
  • 1 large bottle of raw organic local honey
  • 2 cans of coconut milk
  • 16 oz jar of raw almond butter
  • 2 bags of brown rice
  • 5 lb bag of cornmeal
  • 1 bag of goji berries
  • 1 bag of raw organic almonds
  • 1 bag organic turmeric
  • 1 bag organic bay leaves
  • 1 box black pepper

Fresh Veggies

  • 18 boxes of Earthbound Farms Greens (2 Spring Mix, 12 Spinach, 2 Baby Lettuces, 2 Herb Mix Greens) - $.50 each because of BOGO + doubled coupon
  • 3 lbs of organic potato salad (free)
  • 5 lbs of potatoes
  • 3 pounds of yellow squash
  • 3 pounds of zucchini
  • 6 large sweet potatoes
  • 2 lbs of ginger root
  • 3 cucumbers
  • 4 green peppers
  • 6 pounds of onions
  • 4 pounds of organic carrots (2 free)
  • 2 bags of organic celery
  • 1 head of cabbage
  • 11 ears of corn
  • 4 large tomatoes

Frozen Veggies

  • 4 bags of corn
  • 6 bags of okra
  • 4 bags of broccoli

Fresh Fruit
  • 3 bags of lemons
  • 1 bag of organic apples
  • 4 lbs of strawberries (2 free)
  • 1 pint of blueberries
  • 1 watermelon
  • 3 pineapples (free)
  • 5 bags of bananas (store piles a bag full of over ripe bananas for quick sale – around 5 lbs for $1.49. We eat them until they're getting really ripe, then chop them up and pop them in the freezer. Perfect for smoothies, baking or icy treats during the summer heat)

Dairy
  • 1 block of raw parmigiano reggiano cheese
  • 3 pounds of butter
  • 10 bags of shredded Kraft cheese ($.58 each with sale + doubled coupons)
  • 5 blocks of Kraft Sharp Cheddar ($.58 each with sale + doubled coupons)
  • 4 dozen eggs

Special Occasions / Giving
  • 72 bottles of soda (free)
  • 10 boxes of Nutty Buddies (5 free)
  • 1 Pet 56 oz. ice cream (free)
  • 8 Breyers 56 oz. ice cream (6 free)
  • 24 boxes of natural fruit snacks (free)
  • 7 bags of Lay's potato chips ($1 each) 
  • 2 boxes of natural popcorn
  • 1 bag of organic tortilla chips
  • 2 DiGiorno Pizzas
  • TGIF Frozen Spinach Dip (free)
  • 1 box of Totino's pizza rolls (free)
  • Pepperidge Farm Cheese/Garlic Toast (free)

I spend about 5-10 hours a week max (it could be less) for clipping and prepping and try to keep my shopping trips short.  I've heard of people shopping at many different stores to get the best deals, but we only use three (we live in an area where grocery stores are highly competitive). We go to our natural grocer once a month for organic/free range/hormone free meats, large jars of organic apple cider vinegar, raw almonds, organic goji berries, and raw/organic supplements. Then we shop another store once in a while when they have "Buy 2 Get 3 Free" deals if we have coupons to match.  They also have big bags of lemons for less than $2 and you can never have too many lemons (: 

Other than that we do the majority of our shopping at one local store.  They have the best prices for the items we use, they double coupons up to $.99, accept competitor coupons, offer gas discounts and have a great selection of organics.  Respecting the store's coupon policy is a must and shopping tons of stores is just a bit much for this busy gal (;  I like to keep things simple and shopping all over town would drive me crazy...not to mention the gas wasted on store hopping. 

I still have a lot to learn, but it's a process so I’m being patient with myself (:  Once you get the basics down and know what to look for, you'll begin to notice things with little effort.  Sales and coupons will begin to jump out at you, even without a list.

If you’d like to makeover your budget, here are some tips to help with your new couponing adventure...

1) Set a budget and stick to it - Only spend that set amount and no more. If you have money left over at the end of the month, use it to add to your food storage or apply it to debt.

2) Get to know your store, the prices and their coupon policy.

3) Begin to notice the ebb and flow of sales.

4) Prepare and buy ahead.

5) Only buy when the price is rock bottom or at its lowest.

6) When you're searching for coupons and come across “maybe” items, always save them. They could come in handy later.

7) If you have favorite products, go to the company's website and register for their coupons.

8) Swap coupons with others - I don't know a soul who coupons...go figure! But if you have friends who do, get together and share what you can't use.

9) Ask for coupon inserts - Lots of people get the paper and never give coupons a second glance. Ask and ye shall receive (:

10) Don't forget to check the aisles for coupons - Many stores have coupons boxes available with extra coupon deals.  Don't be greedy.  Only take a few and leave some for others (;

11) Operate ethically - We don't agree with UPC matching, using coupons for product that's not stated on the face, using more than one of the same coupon for one item, etc.

Need more help? These are some great sites that have guided me along the way...
Have coupons changed the way you shop?  What kind of makeover has your budget seen because of it?  Have any tips for a newbie?  I'd love to learn more (:

With Gratitude,


New to The Homesteading Cottage?   Don't miss a post and subscribe here...

Wednesday, July 11, 2012

6 Steps to Make Healthy Oven Baked Fries

Thank you for visiting The Homesteading Cottage. If you subscribe to our blog via RSS feed or email, you'll get helpful tips on simplicity, organization, all things DIY, natural cooking, entertaining, homesteading and emergency preparedness sent straight to you!

Who doesn't love a good french fry? They're a favorite around our Homesteading Cottage and a dish we can eat for almost any meal! I learned how to make fries at a young age and the tastiness factor was so good that it quickly became a constant request from family and friends. Oh, the fun that was had tweaking spices to get just the right melding of flavors. Frying was the chosen method of cooking those lovely golden sticks of deliciousness, but we don't fry so much around here anymore.

Oven baked fries don't seem to have the same crunch that oil frying gives and so french fries have totally dropped off our menu...that is, until now! Recently I noticed several pins floating about here and there regarding the different methods of attaining french fry heaven from the oven. Some were more laborious than others. I'm a simple gal so those in-depth recipe options quickly faded. I finally settled on a combination of Martha Stewart's Italian Fries (minus the cheese and herbs) and several others. Here's my version...

Ingredients:
  • 5-7 large potatoes
  • 2 tablespoons of olive oil
  • salt and pepper to taste

1. Wash Potatoes and Cut into Strips.
I tried several versions...some shoe-string thin and then others on the chunkier side. The thin fries cooked faster than their thicker counterparts.  A few batches were baked with the skins on and others without. Same results...yummy!

2. Soak Cut Fries in Salty, Cold Water.
Once cut, place fries in salted water. This is key. Not only does the salty water add flavor, but it brings out the natural sugars in the potato which help them to crisp during baking. The amount of salt depends on you. I prefer not to add salt to my fries once they're cooked, so I use a good bit in the soaking water...maybe 2-3 teaspoons.

TIP: Some people mentioned letting the cut fries soak for at least 30 minutes or more...I think someone even suggested 1-2 hours! Didn't do that...I'm a bit of an impatient cook (; I just added the potatoes to the water as they were cut and then let them sit for maybe another minute or two more before draining. Sometimes I'd let them sit longer if something else needed tending in the kitchen, otherwise a few minutes of soaking was fine.

3. Drain Potatoes and Spin Dry
Once they're done soaking in the salty water, draining and getting the potatoes dry is very important. If water is left behind, the fries will steam instead of crisping. Most people mentioned spreading out paper towels and dumping the drained fries on so they could be patted dry. Um, did that once...took too long, used too many paper towels and I didn't get all the water off. My solution? Instead of wasting paper towels, dump those wet puppies into a salad spinner!! With a few twirls they're bone dry and ready for the next step! Did I mention I'm all about simplicity (;

4. Add Oil and Spices
Since the salad spinner already needs to be washed, dump out the collected water from the bowl, dry it and then pour the fries back in. No need to wash an additional bowl, eh? Add 1-2 tablespoons of olive oil along with your choice of spices to the dry fries and toss until all are coated (turmeric, garlic, onion powder and pepper is our favorite combo). This particular batch had garlic, onion powder, pepper, chili powder, chives and a tad of turmeric. You'll actually be surprised at the small amount of oil needed to get things covered. One tablespoon was enough for us!

TIP: Some recipes suggested sprinkling spices on the fries once they're spread out on the baking sheet...this is fine, but it just means you'll only have spices on one side. I prefer fries to be coated from top to bottom, so I add the spices along with the oil. Easy steps mean added simplicity.

5. Spread on a Baking Sheet
Spread spiced fries out on a baking sheet...it doesn't matter if they're overlapping or slightly piled on each other. I didn't coat our baking sheet with non-sticking spray as suggested since oil is already coating the fries and they were fine.  Again, simple gal...the fewer steps the better (;

TIP: A few stuck to the pan, but they lifted right off with a little coaxing. Adding parchment paper to your pan to prevent sticking is an option if you prefer.

6. Bake at 400°
Bake at 400° for 30 minutes for shoe-string thin fries or 45 minutes for thicker fries. The time can vary depending on your crisp preference, so just keep an eye out at the 30 minute mark. Once the ends begin to turn golden brown, you'll know they're ready!

TIP: The recipe websites I visited suggested rotating the pan after 30 minutes, but we didn't and they were just fine. We "flipped" the fries with our first few batches...basically that means scooping the fries off the pan and tossing them back on. If the fries seemed done, we'd go ahead and eat. If they needed more cooking (just for the thicker fries), then we'd pop the "flipped fries" back in the oven for a few more minutes.

We've baked fries using this recipe over and over again and they seem to get better with each batch! Add cheese and different spices for a new twist every time. Here are some of our favorite flavor combinations...
  • turmeric, garlic, pepper and onion powder
  • paprika, turmeric, cumin, pepper and cayenne
  • oregano, thyme, marjoram, basil and parmigiano reggiano cheese
  • chili powder, onion powder, garlic and romano cheese

I forgot to take photos of the prepping process for this post so the last two shots don't have chives in the recipe in case you're wondering what happened to the chunks of green in the previous photos (: 

We love making these over and over and hope you do too.  You'll never want to eat greasy fried sticks again when you can bake healthy, crispy goodies!! Have you tried oven baked fries? What were your results? We'd love to know any tips you've learned along the way...

With Gratitude,

New to The Homesteading Cottage?   Don't miss a post and subscribe here...

Thursday, July 5, 2012

Healthy Coconut Cream Berry Tart

Thank you for visiting The Homesteading Cottage. If you subscribe to our blog via RSS feed or email, you'll get helpful tips on simplicity, organization, all things DIY, natural cooking, entertaining, homesteading and emergency preparedness sent straight to you!

I recently wrote about Jill from Real Food Forager and her post on the most amazing Star-Spangled Coconut Cream Tart that's gluten-free, dairy-free and Paleo too. We wanted a healthy dessert option for our July 4th celebration and this one looked like the perfect one to try! The photo above of our finished pie isn't as lovely as Jill's, but it'll give you an idea of how our version turned out.

We weren't able to locally find the coconut cream that Jill suggested, but she did mention that the cream from a chilled can of coconut milk could be used just the same (it also makes wonderful whipped cream too). Great! But we made the mistake of getting low fat coconut milk after finding that our store was out of the full fat version. The full fat coconut milk makes a HUGE difference in this recipe, because the fat is what creates the "thick cream" when chilled.

This is what our chilled can of coconut milk SHOULD have looked like...

Since we had the low fat coconut milk, it didn't set or get thick and creamy...but that didn't stop us from enjoying it anyway! We simply put the tart in the freezer so the coconut filling would freeze and we ate it like an ice cream pie. Delicious!!!! Even though it didn't turn out like we had hoped, it was still amazing and we all had seconds (; It's a recipe I highly recommend.

We can't wait to add some twists to this simple concoction in the future...things like banana cream pie or chocolate coconut almond pie...yum!! Jill's recipe is below, but hop over to her site to get info on where to purchase some of the ingredients if you can't get them in your area. She also has a tutorial for making your own almond flour too!

Ingredients for the chocolate crust:
  • 1 medium egg
  • 3 tablespoon raw honey
  • 2 tablespoon coconut oil, butter or ghee
  • 1 teaspoon vanilla
  • 2 cups almond flour
  • 1/4 cup coconut flour plus 1 tablespoon if necessary
  • 1/4 cup cocoa powder
  • 1/2 teaspoon sea salt
  • 1/2 teaspoon baking soda
Instructions for the chocolate crust:
  1. Place all the wet ingredients into a food processor and mix
  2. Add the dry ingredients except the extra tablespoon of coconut flour and process until you get a nicely formed ball
  3. If the dough is sticky, add the extra tablespoon of coconut flour and mix again
  4. Remove the dough from the processor and place into a greased 9 or 10″ tart pan with a removal bottom
  5. Press the dough into the bottom and sides of the pan and even out the bottom as best you can
  6. Bake at 300 degrees for 15 minutes
  7. Let cool
Ingredients for the coconut filling:
  • 1 tablespoon vanilla
  • 2 tablespoon raw honey
  • 1 box coconut cream or 8 ounces of the cream from coconut milk
Instructions for the coconut filling:
  1. Place all the ingredients into a bowl
  2. With a hand mixer (or stand mixer) mix it all together for a few minutes
  3. Place in the freezer for one hour or the refrigerator for several hours to thicken
  4. When the cream is thick, spread it on the cooled crust
We hope you enjoy this dessert as much as we have.  Not only is it a tasty treat, but it's healthy too!  We all have those "go-to" recipes that we use again and again...this tart will be one of our favorites for years to come.

With Gratitude,

New to The Homesteading Cottage?   Don't miss a post and subscribe here...

Monday, July 2, 2012

Makeover Monday - Star-Spangled Coconut Cream Tart

Thank you for visiting The Homesteading Cottage. If you subscribe to our blog via RSS feed or email, you'll get helpful tips on simplicity, organization, all things DIY, natural cooking, entertaining, homesteading and emergency preparedness sent straight to you!

July 4th is right around the corner and we're gathering items for our day of celebration. We didn't want to fall too far from the healthy tree with our desserts and decided to look for a gluten-free makeover option with a touch of 4th of July spirit (: The tart above is a White Balsamic Custard Tart from Bon Appetit and looks so lovely adorned with seasonal fruit.  It's a great recipe, but one filled with lots of wheat and refined sugar...a big no-no in this household.

Thank goodness for foodies who appreciate the focus of health.  Because of them we can still have sweet delicacies and feel good about them too (:  Jill from Real Food Forager posted the most amazing recipe that we can't wait to try!! It's a Star-Spangled Coconut Cream Tart that's gluten-free, dairy-free and Paleo too.

The crust is a concoction of egg (substitute soaked flax seeds if allergic to eggs), raw honey, coconut oil (butter or ghee - your choice), vanilla, almond flour, coconut flour, cocoa powder, sea salt and baking soda. The filling is as simple as it gets...just a box of coconut cream, vanilla and raw honey. Yum!! Top with red and blue berries and you've got a healthy treat that should have them coming back for more!

Due to the simplicity, this recipe can be tweaked to create a ton of variations.  Leave out the cocoa powder from the crust recipe and you have a basic all-purpose crust for desserts, quiches or savory side dishes.  If you're hankering for a banana cream pie, pop coconut cream, a tad of raw honey and frozen bananas in a food processor for a dreamy treat that will become a family favorite.  Hop over to Jill's site for details on how to make it and bring some nutritious makeover fun to your holiday celebration.

With Gratitude,


New to The Homesteading Cottage?   Don't miss a post and subscribe here...
Related Posts with Thumbnails