Showing posts with label Natural Kitchen. Show all posts

Thursday, September 5, 2013

Apple Ginger Lemonade Recipe

On a shopping trip the other day, I happened across a sale on apple juice. Bottled apple juice isn't something I've purchased in while.  In fact I think it's been over 25 yrs, but when you've got a few coupons for organic 100% apple juice and those coupons make that juice free...well, needless to say it goes in the cart (;

Even though it’s not a juice we like to drink, I was sure it would come in handy with other recipes. Little did I know it would be used to create a favorite new drink recipe during a late night fridge plundering episode. Now we can’t get enough of Apple Ginger Lemonade (;

We use lemons and ginger in everything so adding it to the apple juice was a no brainer! It makes the most refreshing, cool blend of flavors to sooth the heat of the ending summer. Here’s the recipe for our yummy concoction…

       ~ crushed ice
       ~ filtered water
       ~ organic 100% apple juice
       ~ fresh ginger root
       ~ lemon wedges

Fill half of your glass with crushed ice and then add half a glass of filtered water. Now grate a nice little pile of fresh ginger on top of the ice water (ginger grates much easier when it's frozen and using a microplane for a fine grate is best so it mixes well).

Next add the juice of 2 lemon wedges (or more depending on your lemon love...2 lemon wedges equals half a small lemon in this house). Top things off with apple juice, filling the rest of the glass. Shake and enjoy!!

It’s great for the digestion, not to mention your immune system and it’s refreshing to boot!!  If you’d like to go even more natural with this drink, here are a couple more options to pack on the nutrition…

       1)  If bottled juice isn't your thing, juice your own fresh apples…skin and all!

       2)  Turn the drink into a smoothie.  Plan ahead and make frozen apple cubes.
            Chop an apple into chunks and place them in a Ziploc bag along with the
            juice of a few lemon wedges (the lemon helps to prevent browning). Then
            pop them in the freezer. Once the apples are completely frozen, place them
            in a blender along with ice, filtered water, ginger root, lemon wedges and
            voilà! Instant Apple Ginger Lemonade Smoothie!!

Foods are healing and it’s so important to have a good portion of raw goodies each day. This drink (or smoothie if you prefer) is the perfect addition to any meal plan.  Here are just some of the healing benefits that these nutrient dense foods offer…

Benefits of apples: full of anti-oxidants, lowers cholesterol, keeps the heart healthy, decreases your risk of diabetes, boosts the immune system, aids in weight loss, reduces the risk of asthma, aids the liver, lowers cholesterol, prevents high blood pressure, staves off Alzheimer’s disease, helps to prevent many types of cancers, promotes hair growth, protects from osteoporosis and may also increase bone density.

Benefits of ginger: has anti-viral, anti-toxic and anti-fungal properties, helps to prevent/treat colds and flu, acts as an antihistamine to sooth allergies, the anti-inflammatory components help to treat muscular disorders caused by inflammation, calms upset stomachs, lowers blood sugar levels, relieves bloating and gas, aids in digestion, lowers cholesterol, prevents the formation of blood clots, can quiet a cough, soothe a sore throat and helps with nausea, seasickness, morning sickness and motion sickness.

Benefits of lemons: antibacterial and anti-viral properties, balances the body’s PH levels, boosts the immune system, helps with weight loss, aids the digestion, is a liver cleanser, helps to fight infection, can be effective in treating acne, eases the symptoms of chills and fevers, can soothe a sore throat and can help to lower high blood pressure.

So give some apples, ginger and lemons a try and quench your summer thirst.  We're sure this new recipe will be a favorite for years to come (;

In Gratitude,


New to The Homesteading Cottage?   Don't miss a post and subscribe here or type in your email address below for updates delivered straight to your inbox...
Enter your email address to subscribe:


Delivered by FeedBurner

Linking up with: My Healthy Green Family, Simple Living and Eating, Finding Fabulous, Bacon Time with the Hungry Hypo, The Grant Life,

Wednesday, August 8, 2012

Prep Ahead with Easy Summer Salads

Thank you for visiting The Homesteading Cottage. If you subscribe to our blog via RSS feed or email, you'll get helpful tips on simplicity, organization, all things DIY, natural cooking, entertaining, homesteading and emergency preparedness sent straight to you!

I don't know about you, but summers around here are a bit slower than the rest of the year. Warm days filled with gardening, bike rides and picnics allow us to relax and seek a different pace. Even in this extra relaxed state of being, for some reason I find myself wanting to stay out of the kitchen. I love to cook, create and blend new concoctions, but during the warmer season I hibernate...go figure! It's all about the grab and go options for this gal.

{Source: Southern Living}

An idea I love is prepping ahead by creating different meals in mason jars...preferably salads. We've been eating and drinking out of mason jars for YEARS and it's quite funny how this "new idea" has caught on. But don't all good ideas come around again...just look at fashion. Give it about 20 years and the style will come back with an added twist (;

{Source: Country Living}

First, we love glass for food storage. You don't have to worry about the toxins, it keeps the food fresh and mason jars are spill proof. Who knew putting salads in them would catch on and become hot!! They store easily in the fridge and many of these jar combos can be made ahead for those days when there isn't a lot time to hang out in the kitchen.


The key to easy grab and go salads is keeping the dressing on the bottom. I usually like a vinaigrette style dressing and make sure to place hearty veggies in the bottom...ones that will marinate when in contact with the dressing. Things like onions, carrots, tomatoes, peppers, corn, olives, cucumbers, etc. More fragile veggies like lettuces and herbs go on top to prevent wilting.


Once you're ready to eat, either shake to get things mixed and eat right out of the jar or simply dump everything out in a bowl. Make different variations and keep several in the fridge so you can grab and go! Simplicity at its best. If you're new to eating in mason jars, Rich Mackey has a great step-by-step approach to get you started.

{Source: Rich Mackey}

Do you use mason jars? What are your favorite grab and go jar meals?

With Gratitude,

New to The Homesteading Cottage?   Don't miss a post and subscribe here...

Wednesday, August 1, 2012

Healthy Oven Fried Okra

Thank you for visiting The Homesteading Cottage. If you subscribe to our blog via RSS feed or email, you'll get helpful tips on simplicity, organization, all things DIY, natural cooking, entertaining, homesteading and emergency preparedness sent straight to you!

Along with french fries, fried okra is a favorite side dish at our homestead. If you've never fried okra in coconut oil, then you're missing something fabulous!! Frying in coconut oil is a great way to have that fried treat, but in a healthy way. Well, one day that okra craving hit and we were out of coconut oil. What to do? Not long ago we learned that baked fries can be awesome and we wondered if there might be a way to get the same great results with baked okra.

After a little online searching, sure enough there is! Here are the steps that have worked the best for us...

Ingredients:
  • 16 oz. bag of frozen okra
  • 2-4 tablespoons of corn meal
  • 1-2 tablespoons of olive oil
  • salt and pepper to taste (we also like a tad of cayenne pepper for a kick)

1. Add one 16 oz. bag of frozen okra to a ziploc bag with few pinches of salt
Let the bag sit for about 10-30 minutes (If you don't have the time to wait, I've let the bag sit for a minimum of 10 minutes with good results). This gives the salt time to extract the juices from the okra.

2. Add 2-4 tablespoons of corn meal, 1-2 tablespoons olive oil and spices of your choosing
Add the olive oil first, then the corn meal with the spices on top. Zip it closed and "flip" the bag over again and again until the okra if fully coated. If you see that the okra isn't coated enough to your liking, then add more cornmeal.

We use 4 tablespoons, but it really just depends on your coating preference. (We also used self-rising corn meal because that's what we had in the pantry. Since salt is already in the self-rising corn meal, we didn't add more during the spice stage. If you're using plain corn meal, then you'll want to add salt to taste).

TIP: Different recipes suggested using oil spray to coat the okra before baking to help create that crispy crust. We don't use canned sprays, but found that adding olive oil in the bag with the cornmeal and spices did the trick!

3. Let the coated okra rest for 10-30 minutes
I usually let it rest for 20 minutes, but have also had great success with a 10 minute set. You just want to give enough time for the juices in the okra and the coating to meld so the coating won't fall off. We used to dip okra in eggs or soaked flaxseed meal before dipping the okra into the corn meal. This new "bag method" saves so much time and you're using less items to make the same great treat!!

4. Pour Okra onto a Baking Sheet
You can grease the sheet if you like, but we never have and the okra comes right off. (Much like our oven baked fries, sometimes the okra may need a little coaxing, but then they pop right up.)

5. Bake at 400° for 30 minutes
After 30 minutes you'll have the most delicious baked okra! It's not as crunchy as okra fried in coconut oil, but it's darn close. We haven't gone back to frying yet!

The summer isn't quite the same without having at least one meal of tomato sandwiches, corn on the cob, fried okra and watermelon. There are those moments when the okra and french fry cravings hit at the same time, so we've been known to bake a pan filled with half fries and half okra! Each recipe calls for the same baking time and temperature so it makes the perfect batch on those days when you just can't decide (; Enjoy!

With Gratitude,

New to The Homesteading Cottage?   Don't miss a post and subscribe here...

Monday, July 23, 2012

Makeover Monday - How to Stock a Healthy Pantry

If you're pantry is full of junk and processed foods it might be time for a makeover (:  Keeping a well stocked natural pantry is a blessing when unexpected company arrives, but it can also provide the necessary nutrition if an emergency hits. This emergency could be a power outage, illness or even a job loss. The simple act of keeping the cupboards stocked with healthy staples means your household will be taken care of even during times of stress.

My Grandmother was a preparer and had it down to a skillful science. She always had extra items on hand to share with loved ones or those in need. We never left her home without a bag of groceries or extra helpings from our dinners together. As the years pass by, I'm appreciating Grandmother's knack for planning ahead more and more.

Recently terms like preparedness and stockpiling have been bandied about. I think when most people hear the term stockpiling they either think of some seclusionist in the hills getting ready for the end of the world or the extreme couponing show where "savvy" shoppers proudly show off their tons of toiletries, noodles and canned goods.

I was introduced to the stockpiling concept over 20 years ago by my best friend in high school. Self reliance was very important to her family and so they maintained a year's worth of food to assure their viability during troubled times. I thought it a little strange that the guest room had been converted into a pantry, but I now grasp the enormous benefits of such an undertaking. We may not have a stockpile room dedicated to a year's worth of food, but we're working our way there (:

With the changing economy and a focus on self-sufficiency, the drive to create a long term source of staples is ever-present. Homesteading is all about self-sufficiency and our goal is to have a spot of land with fruit and nut trees, gardens, chickens and goats, but our current location is a temporary one. We aren't sure how long we'll be here, therefore growing our own food has been put on hold. So what does a homesteader at heart to do when she's stuck in the city without a garden? She grows a healthy pantry (:

I wrote a recent post about giving our budget a makeover by using coupons. Today I'd like to show you how to makeover your pantry by including healthy basics that can be used to create an abundance of nutritious meals. If it's processed, it doesn't make the cut. I find that a product with an ingredient list of words I can't pronounce, much less spell, has no business being in the ol' tummy (:

Focus on whole foods, buy organic when possible (if you don't have a garden or go to the farmer's market), go crazy with a dehydrator and learn the art of canning/fermenting foods. If canning and dehydrating aren't in the cards for you, that's okay...there are lots of great options on the grocery store shelves for those who don't.

We stick with whole grains, gluten-free flours and meals, keep refined sugars out and make all of our dressings and sauces. Below is a list of our pantry staples and ones we enjoy on a regular basis...

Grains - brown rice, millet, quinoa (millet and quinoa are actually seeds not grains, but we use them in place of other grains)

Ground Meals & Flours - cornmeal, flaxseed meal, coconut flour, almond flour

Baking Goods - baking soda, cornstarch, arrowroot, cream of tartar, cocoa powder

Oils, Vinegars & Condiments - extra virgin olive oil, coconut oil, fermented ketchup, spicy mustard, raw apple cider vinegar, white vinegar, balsamic vinegar, red wine vinegar

Root Veggies - Red potatoes, gold/white potatoes, sweet potatoes, onions, shallots, garlic, ginger (we always peel and freeze our garlic and ginger for extra long storage life)

Dried Fruit - goji berries, elderberries, prunes, dates, figs, raisins, blueberries, cranberries, banana chips, apples, apricots, cherries, sun dried tomatoes

Nuts & Seeds - almonds, walnuts, pecans, flaxseeds, millet, quinoa, pepitas (pumpkin seeds), pine nuts, sesame seeds, sunflower seeds, chia seeds

Canned Goods - crushed and diced tomatoes, tomato paste, canned pumpkin, beef and chicken broth (we make our own and store it in the freezer, but there are some great organic boxed options), coconut milk (we prefer to make our own, but the canned milk makes great whipped topping in a pinch), almond butter, beans (canned or dried), black and green olives, sauerkraut, pickles, pepperoncinis, roasted red peppers, tuna, wild salmon. 

**We're learning so much about the importance of relying on fermented foods instead of traditional canned goods, but still have a bit more studying in this area...we'll talk more about that in another post**

Natural Sweeteners - raw honey, pure maple syrup, rapadura/sucanat, stevia

Teas - black, green, red, hibiscus, mint

Misc - popcorn, raw cacao nibs, coconut flakes, jerky, vanilla, vanilla beans, brown rice pasta, Nori seaweed sheets

Herbs and Spices - allspice (whole and ground), bay leaves, basil, caraway seeds, cayenne pepper, celtic sea salt/kosher salt, cinnamon sticks, chili powder, chipotle, cilantro, cloves, coriander, crushed red pepper, cumin, dill, dry mustard, dried shallots, fennel seeds, garlic powder, marjoram, nutmeg, onion powder, oregano, paprika, pepper, peppermint, poppyseeds, rosemary, sage, tarragon, thyme, turmeric

Storing all of these goodies can be a fun process too (: I like to put things like grains, meals, beans, teas, jerky, dried fruit, nuts (we store the bulk of the nuts in the freezer for longer storage life) and pastas in glass jars. Spices are stored in our magnetic spice tins, root veggies are always perched in baskets for air flow (have you ever smelled a rotten potato left in a plastic bag? Yikes!!) and we love to repurpose glass jars and bottles after peppers, pickles, vinegars and oils have been used. Slap a chalkboard label on and it turns into something special (:

If you'd like to overhaul your pantry with a makeover, start small. You may currently have a lot of junk on your shelves, but don't feel like everything needs to be thrown out at once. Use what you have, replace it with a healthy option and then stock up when the sales are rock bottom. Before you know it you're pantry will become a healthy stockpile that will feed your family for months to come. Still need more help? "Urban Pantry - Tips and Recipes for a Thrifty, Sustainable and Seasonal Kitchen" by Amy Pennington is a great place to start.

With Gratitude,


New to The Homesteading Cottage?   Don't miss a post and subscribe here...

We're joining the Homestead Barnhop #71 today...join us in the fun!

Wednesday, July 18, 2012

Tips on Freezing Orange Juice

Thank you for visiting The Homesteading Cottage. If you subscribe to our blog via RSS feed or email, you'll get helpful tips on simplicity, organization, all things DIY, natural cooking, entertaining, homesteading and emergency preparedness sent straight to you!

We love our local grocery store! Not only are the prices great, but they are wonderful about giving free products to returning customers. At the bottom of each receipt we're given a code to use to fill out an online survey about our shopping experience...was the store clean, were we greeted upon entering and leaving, were we able to find what we needed, etc.

With every completed survey, we're given a coupon for free product and this month orange juice was the featured freebie. At the time, this gallon of orange goodness was $4.99 and we were able to collect quite a few coupons. That meant our fridge was filled to the brim with oj in a home where we don't normally drink a lot of the stuff.

Recently in our couponing post, I talked about taking advantage of free product opportunities even if it's not something you use a lot. We love orange juice, but it can be expensive so we focus on water, tea and cranberry juice for most of our drinking needs. We were so excited when the new oj coupons came out, but I knew we couldn't drink the majority of that juice before it expired. The solution? Freezing!

We already freeze broth, veggies, fruit, garlic, herbs and ginger...why not juice?! The neat thing about freezing orange juice in ice cube trays is that the smaller amounts can be used quite easily. Whenever you need juice for a drink, simply place the frozen cubes in a pitcher and the next day you'll have fresh oj for breakfast!

Our favorite thing is to add a few cubes into morning smoothies. It takes the place of ice so the smoothie isn't watered down. Another great idea is to pop several cubes in the food processor or blender along with a tablespoon of olive oil, fresh ginger, fresh garlic, a touch of honey, salt and pepper. It makes an amazing sauce to pour over chicken breasts cooked in the oven. Yum!

For a twist on a healthy summer treat, put popsicle sticks into the cubes when they're almost frozen. Once they're solid, the cubes turn into mini orange popsicles for the kids (the adults in our home love them too!). A simple dessert that's natural and so much better than processed sugar popsicles.

To make our orange juice ice cubes we used 9 ice trays and did the following...

1. Poured orange juice into ice cube trays

2. We left them in the freezer overnight and then dumped the cubes into a glass bowl to make it easier to fill the bags

3. Filled Ziploc bags with oj cubes and stored them in the freezer for future use.

It feels like it's taken forever to freeze all that juice and to be honest, we still have quite a few more gallons waiting to be transformed into little cubes of frozen magic. Just like stocking a healthy pantry, adding to your freezer can be well worth all the hard work for months to come. Keep a look out for a new post on How to Stock a Healthy Freezer soon!

So what goodies are lurking in your freezer? What are your favorite stocked freezer items and how do you freeze them? We'd love to know (;

With Gratitude,

New to The Homesteading Cottage?   Don't miss a post and subscribe here...

Wednesday, July 11, 2012

6 Steps to Make Healthy Oven Baked Fries

Thank you for visiting The Homesteading Cottage. If you subscribe to our blog via RSS feed or email, you'll get helpful tips on simplicity, organization, all things DIY, natural cooking, entertaining, homesteading and emergency preparedness sent straight to you!

Who doesn't love a good french fry? They're a favorite around our Homesteading Cottage and a dish we can eat for almost any meal! I learned how to make fries at a young age and the tastiness factor was so good that it quickly became a constant request from family and friends. Oh, the fun that was had tweaking spices to get just the right melding of flavors. Frying was the chosen method of cooking those lovely golden sticks of deliciousness, but we don't fry so much around here anymore.

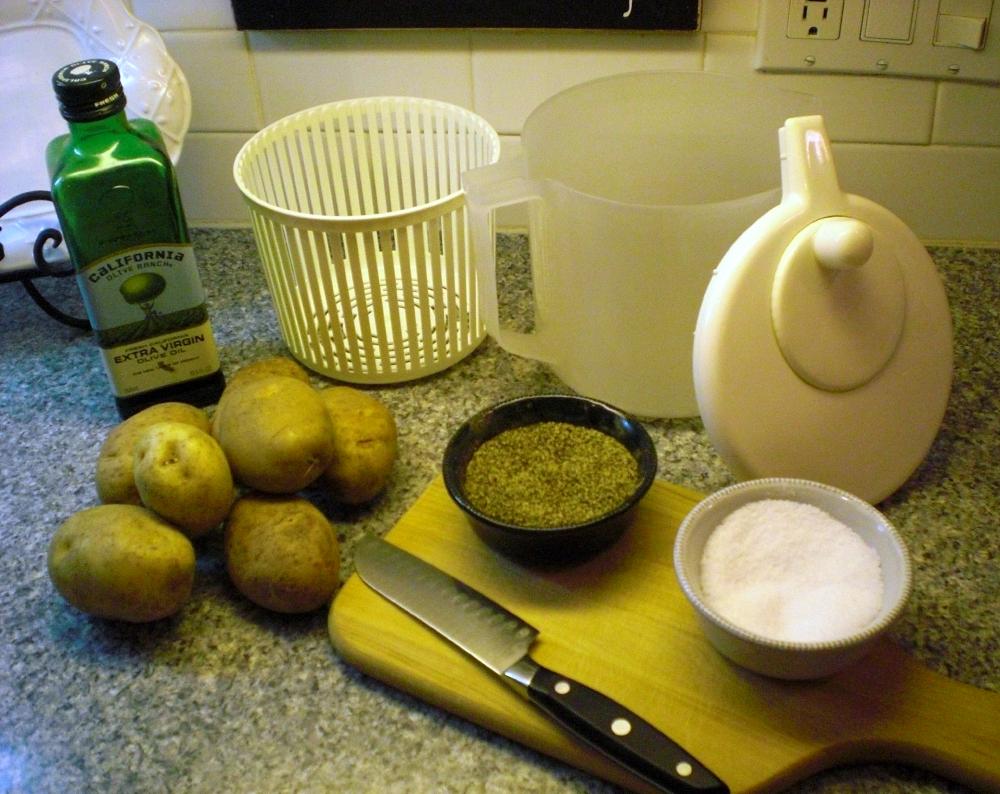
Oven baked fries don't seem to have the same crunch that oil frying gives and so french fries have totally dropped off our menu...that is, until now! Recently I noticed several pins floating about here and there regarding the different methods of attaining french fry heaven from the oven. Some were more laborious than others. I'm a simple gal so those in-depth recipe options quickly faded. I finally settled on a combination of Martha Stewart's Italian Fries (minus the cheese and herbs) and several others. Here's my version...

Ingredients:
  • 5-7 large potatoes
  • 2 tablespoons of olive oil
  • salt and pepper to taste

1. Wash Potatoes and Cut into Strips.
I tried several versions...some shoe-string thin and then others on the chunkier side. The thin fries cooked faster than their thicker counterparts.  A few batches were baked with the skins on and others without. Same results...yummy!

2. Soak Cut Fries in Salty, Cold Water.
Once cut, place fries in salted water. This is key. Not only does the salty water add flavor, but it brings out the natural sugars in the potato which help them to crisp during baking. The amount of salt depends on you. I prefer not to add salt to my fries once they're cooked, so I use a good bit in the soaking water...maybe 2-3 teaspoons.

TIP: Some people mentioned letting the cut fries soak for at least 30 minutes or more...I think someone even suggested 1-2 hours! Didn't do that...I'm a bit of an impatient cook (; I just added the potatoes to the water as they were cut and then let them sit for maybe another minute or two more before draining. Sometimes I'd let them sit longer if something else needed tending in the kitchen, otherwise a few minutes of soaking was fine.

3. Drain Potatoes and Spin Dry
Once they're done soaking in the salty water, draining and getting the potatoes dry is very important. If water is left behind, the fries will steam instead of crisping. Most people mentioned spreading out paper towels and dumping the drained fries on so they could be patted dry. Um, did that once...took too long, used too many paper towels and I didn't get all the water off. My solution? Instead of wasting paper towels, dump those wet puppies into a salad spinner!! With a few twirls they're bone dry and ready for the next step! Did I mention I'm all about simplicity (;

4. Add Oil and Spices
Since the salad spinner already needs to be washed, dump out the collected water from the bowl, dry it and then pour the fries back in. No need to wash an additional bowl, eh? Add 1-2 tablespoons of olive oil along with your choice of spices to the dry fries and toss until all are coated (turmeric, garlic, onion powder and pepper is our favorite combo). This particular batch had garlic, onion powder, pepper, chili powder, chives and a tad of turmeric. You'll actually be surprised at the small amount of oil needed to get things covered. One tablespoon was enough for us!

TIP: Some recipes suggested sprinkling spices on the fries once they're spread out on the baking sheet...this is fine, but it just means you'll only have spices on one side. I prefer fries to be coated from top to bottom, so I add the spices along with the oil. Easy steps mean added simplicity.

5. Spread on a Baking Sheet
Spread spiced fries out on a baking sheet...it doesn't matter if they're overlapping or slightly piled on each other. I didn't coat our baking sheet with non-sticking spray as suggested since oil is already coating the fries and they were fine.  Again, simple gal...the fewer steps the better (;

TIP: A few stuck to the pan, but they lifted right off with a little coaxing. Adding parchment paper to your pan to prevent sticking is an option if you prefer.

6. Bake at 400°
Bake at 400° for 30 minutes for shoe-string thin fries or 45 minutes for thicker fries. The time can vary depending on your crisp preference, so just keep an eye out at the 30 minute mark. Once the ends begin to turn golden brown, you'll know they're ready!

TIP: The recipe websites I visited suggested rotating the pan after 30 minutes, but we didn't and they were just fine. We "flipped" the fries with our first few batches...basically that means scooping the fries off the pan and tossing them back on. If the fries seemed done, we'd go ahead and eat. If they needed more cooking (just for the thicker fries), then we'd pop the "flipped fries" back in the oven for a few more minutes.

We've baked fries using this recipe over and over again and they seem to get better with each batch! Add cheese and different spices for a new twist every time. Here are some of our favorite flavor combinations...
  • turmeric, garlic, pepper and onion powder
  • paprika, turmeric, cumin, pepper and cayenne
  • oregano, thyme, marjoram, basil and parmigiano reggiano cheese
  • chili powder, onion powder, garlic and romano cheese

I forgot to take photos of the prepping process for this post so the last two shots don't have chives in the recipe in case you're wondering what happened to the chunks of green in the previous photos (: 

We love making these over and over and hope you do too.  You'll never want to eat greasy fried sticks again when you can bake healthy, crispy goodies!! Have you tried oven baked fries? What were your results? We'd love to know any tips you've learned along the way...

With Gratitude,

New to The Homesteading Cottage?   Don't miss a post and subscribe here...

Thursday, July 5, 2012

Healthy Coconut Cream Berry Tart

Thank you for visiting The Homesteading Cottage. If you subscribe to our blog via RSS feed or email, you'll get helpful tips on simplicity, organization, all things DIY, natural cooking, entertaining, homesteading and emergency preparedness sent straight to you!

I recently wrote about Jill from Real Food Forager and her post on the most amazing Star-Spangled Coconut Cream Tart that's gluten-free, dairy-free and Paleo too. We wanted a healthy dessert option for our July 4th celebration and this one looked like the perfect one to try! The photo above of our finished pie isn't as lovely as Jill's, but it'll give you an idea of how our version turned out.

We weren't able to locally find the coconut cream that Jill suggested, but she did mention that the cream from a chilled can of coconut milk could be used just the same (it also makes wonderful whipped cream too). Great! But we made the mistake of getting low fat coconut milk after finding that our store was out of the full fat version. The full fat coconut milk makes a HUGE difference in this recipe, because the fat is what creates the "thick cream" when chilled.

This is what our chilled can of coconut milk SHOULD have looked like...

Since we had the low fat coconut milk, it didn't set or get thick and creamy...but that didn't stop us from enjoying it anyway! We simply put the tart in the freezer so the coconut filling would freeze and we ate it like an ice cream pie. Delicious!!!! Even though it didn't turn out like we had hoped, it was still amazing and we all had seconds (; It's a recipe I highly recommend.

We can't wait to add some twists to this simple concoction in the future...things like banana cream pie or chocolate coconut almond pie...yum!! Jill's recipe is below, but hop over to her site to get info on where to purchase some of the ingredients if you can't get them in your area. She also has a tutorial for making your own almond flour too!

Ingredients for the chocolate crust:
  • 1 medium egg
  • 3 tablespoon raw honey
  • 2 tablespoon coconut oil, butter or ghee
  • 1 teaspoon vanilla
  • 2 cups almond flour
  • 1/4 cup coconut flour plus 1 tablespoon if necessary
  • 1/4 cup cocoa powder
  • 1/2 teaspoon sea salt
  • 1/2 teaspoon baking soda
Instructions for the chocolate crust:
  1. Place all the wet ingredients into a food processor and mix
  2. Add the dry ingredients except the extra tablespoon of coconut flour and process until you get a nicely formed ball
  3. If the dough is sticky, add the extra tablespoon of coconut flour and mix again
  4. Remove the dough from the processor and place into a greased 9 or 10″ tart pan with a removal bottom
  5. Press the dough into the bottom and sides of the pan and even out the bottom as best you can
  6. Bake at 300 degrees for 15 minutes
  7. Let cool
Ingredients for the coconut filling:
  • 1 tablespoon vanilla
  • 2 tablespoon raw honey
  • 1 box coconut cream or 8 ounces of the cream from coconut milk
Instructions for the coconut filling:
  1. Place all the ingredients into a bowl
  2. With a hand mixer (or stand mixer) mix it all together for a few minutes
  3. Place in the freezer for one hour or the refrigerator for several hours to thicken
  4. When the cream is thick, spread it on the cooled crust
We hope you enjoy this dessert as much as we have.  Not only is it a tasty treat, but it's healthy too!  We all have those "go-to" recipes that we use again and again...this tart will be one of our favorites for years to come.

With Gratitude,

New to The Homesteading Cottage?   Don't miss a post and subscribe here...

Monday, July 2, 2012

Makeover Monday - Star-Spangled Coconut Cream Tart

Thank you for visiting The Homesteading Cottage. If you subscribe to our blog via RSS feed or email, you'll get helpful tips on simplicity, organization, all things DIY, natural cooking, entertaining, homesteading and emergency preparedness sent straight to you!

July 4th is right around the corner and we're gathering items for our day of celebration. We didn't want to fall too far from the healthy tree with our desserts and decided to look for a gluten-free makeover option with a touch of 4th of July spirit (: The tart above is a White Balsamic Custard Tart from Bon Appetit and looks so lovely adorned with seasonal fruit.  It's a great recipe, but one filled with lots of wheat and refined sugar...a big no-no in this household.

Thank goodness for foodies who appreciate the focus of health.  Because of them we can still have sweet delicacies and feel good about them too (:  Jill from Real Food Forager posted the most amazing recipe that we can't wait to try!! It's a Star-Spangled Coconut Cream Tart that's gluten-free, dairy-free and Paleo too.

The crust is a concoction of egg (substitute soaked flax seeds if allergic to eggs), raw honey, coconut oil (butter or ghee - your choice), vanilla, almond flour, coconut flour, cocoa powder, sea salt and baking soda. The filling is as simple as it gets...just a box of coconut cream, vanilla and raw honey. Yum!! Top with red and blue berries and you've got a healthy treat that should have them coming back for more!

Due to the simplicity, this recipe can be tweaked to create a ton of variations.  Leave out the cocoa powder from the crust recipe and you have a basic all-purpose crust for desserts, quiches or savory side dishes.  If you're hankering for a banana cream pie, pop coconut cream, a tad of raw honey and frozen bananas in a food processor for a dreamy treat that will become a family favorite.  Hop over to Jill's site for details on how to make it and bring some nutritious makeover fun to your holiday celebration.

With Gratitude,


New to The Homesteading Cottage?   Don't miss a post and subscribe here...

Monday, June 18, 2012

Makeover Monday - Gluten Free Pizza

Thank you for visiting The Homesteading Cottage. If you subscribe to our blog via RSS feed or email, you'll get helpful tips on simplicity, organization, all things DIY, natural cooking, entertaining, homesteading and emergency preparedness sent straight to you!


Pizza is a favorite in our home and one that was a first to get a healthy makeover. Since we have gluten sensitivity/intolerance in the family, we like to keep these happy little discs of cheese as far from gluten as possible (: A simple change of the crust and the use of raw cheese was an easy fix.


In this particular application we used corn tortillas, but we also love Bob's Red Mill Gluten Free Pizza Crust. One package makes two 12" crusts and we always substitute flax seeds for the eggs with great success. The kiddos actually prefer this crust to any restaurant or take-out pizza. Flax seed, gluten-free pizza crust is amazing!! It does get a tad bit sticky when spreading it out, but a little olive oil on your hands keeps the stickies away.

TIP: If you're using tortillas like we are today and like to load up on the toppings, stack a couple of toasted tortillas together with cheese in between for a pizza crust with some umph!


We like to make our own pizza sauce with a can of crushed tomatoes, oregano, rosemary, thyme, basil, a small onion, several cloves of garlic (or garlic powder), pepper, sea salt and a touch of honey. We like it on the chunky side, but if you prefer a smooth sauce, simply purée the ingredients together. Spread the sauce on first...


Now for the toppings! When you let the kids build their own little mini pizzas, they're more willing to add items they might not normally try. The flavor options are endless, but today we have grass-fed beef, onions, peppers and spinach. Yum!

Other topping combos we love...
  • Veggie Lovers - Onions, roasted peppers, sundried tomatoes, olives, artichokes, spinach, mushrooms, roasted garlic, shredded squash and zucchini, shredded carrots, topped with cheese.
  • Hawaiian Delight - Sausage, pineapple, onions and your favorite cheese.
  • Broccoli Forest - Ham, broccoli, onions and cheddar.
  • Greek Dream - Chicken, feta, spinach, black olives, onions and peppercinis.
  • BBQ Gal - BBQ sauce in place of tomato sauce, shredded beef or chicken, onions, pickles and swiss. Heat and then top with vinegar slaw.
  • Taco Tilt - Taco sauce in place of tomato sauce, beef, onions, olives, black beans, corn and cheese. Heat and then top with lettuce, tomatoes, shredded carrots and salsa.
  • Cheeseburger Pizza - Hamburger, red onions, diced pickles, light drizzle of mustard and ketchup and topped with cheddar. Amazing how good this one is!! 

Next is the raw cheese and we use plenty of it (; Our favorites are parmigiano reggiano, asiago, cheddar, gouda, feta and swiss. Today we're using gouda and cheddar.


Pop them in the oven until the cheese melts and everything is bubbling together...


And voilà! Gluten-free pizza in under 30 minutes without even ordering for delivery. If you keep a variety of toppings made in advance, it can take even less time. A great healthy meal you can feel good about feeding your family! Taking traditional comfort foods and giving them a healthy makeover is a simple way to provide well-balanced nutrition.

Get the kiddos involved and have some fun creating new recipes that will become family favorites for years to come. Have you performed some makeover magic in your kitchen lately?

With Gratitude,


New to The Homesteading Cottage?   Don't miss a post and subscribe here...
Related Posts with Thumbnails