Showing posts with label Recipes. Show all posts

Tuesday, September 10, 2013

A Cup of Healing Broth


Chicken stock is one of those simple staples that we prefer to have on hand at all times.  It's a great add to soul warming soups and stews, but we love to incorporate it in just about everything conjured up on the stove.  Broth offers that level of richness to recipes that can't be matched, making it the magic ingredient you'll use time and time again.

Not only is broth a staple in cooking, but it's also a nutritional powerhouse as well...rich in minerals like calcium, magnesium, phosphorus and other trace minerals and an excellent source of amino acids, gelatin, glucosamine and chondroitin.

If you want to give your immune system a boost, simply add broth to your diet.  There's a reason chicken soup always comes out during the cold and flu season...this cure-all is packed with the good stuff to get you back up in running in no time!  We love to sip on a cup first thing in the morning to get us going and then in the evening to round out the day.


I use the recipe from Nourishing Traditions to create our healing pot of broth, with a couple of tweaks of turmeric and garlic to boost liver function...

Ingredients:
  • 1 whole free range chicken or 2 to 3 pounds of chicken parts (breast, wing, leg, thigh, neck) 
  • 4 quarts cold filtered water 
  • 2 tablespoons apple cider vinegar 
  • 1-2 tablespoons turmeric 
  • 5 cloves of garlic 
  • 1 large onion, coarsely chopped 
  • 2 carrots, coarsely chopped 
  • 3 celery sticks, coarsely chopped 
  • 1 bunch of parsley
Instructions:
  1. Place chicken (chicken pieces) in a large stock pot with water, vinegar, turmeric, garlic and veggies except for the parsley.
  2. Let stand 30 minutes to 1 hour.
  3. Bring to a boil and remove scum that rises to the top.
  4. Reduce heat, cover and simmer for 6 to 8 hours.  The longer you cook the stock, the richer and more flavorful it will be.
  5. About 10 minutes before finishing the stock, add parsley.
  6. Remove chicken (chicken pieces and bones).
  7. Strain the stock into a large bowl and put in the fridge until the fat rises to the top and congeals.
  8. Skim off the fat and save to use in place of oil in other recipes.
  9. Reserve the stock in covered containers in your fridge or freezer.

After the bird is cooked, the meat put away and the broth stored up, I pop the bones back in the pot to create another round of brothy goodness (;  I add the same amount of everything above minus the chicken or chicken parts because we're using the bones.

If stewing chicken isn't your thing, you can still make great broth.  When baked chicken is on our menu, we always make sure to save the bones and store them in the freezer until we're ready for broth makin' time.  Nothing wasted here (;

Jenny from Nourished Kitchen has a great Perpetual Soup recipe using the crock pot that's also a great option so you don't feel chained to the stove.


We store broth that's going to be consumed within the next day or so in glass jars.  The rest is frozen in ice cube trays for quick access.  Once cubes are completely frozen, they're popped into Ziploc bags and kept in the freezer.  This is a great way to have stock on hand at any time and in easy portion sizes.  Two cubes equals 1/4 cup.

So the next time you're looking for a simple nourishing meal, try a cup or two of healing broth.  You might just be surprised at how much better you'll feel (;

In Gratitude,


New to The Homesteading Cottage?   Don't miss a post and subscribe here or type in your email address below for updates delivered straight to your inbox...

Enter your email address to subscribe:


Delivered by FeedBurner

Friday, September 6, 2013

5 Simple Steps to Whiten Your Teeth


Well, it’s Frugal Friday again and today’s focus is the ol’ choppers.  We’ll talk more next week about a dental hygiene routine (including how to make your own toothpaste), but right now it’s all about the color of the pearly whites.

I’ve never been one of those gals obsessed with the whiteness of my teeth.  Personally I just feel there are more important things going on in the world than being worried about the whitey brightness of the enamel-covered structures in my mouth. 

But that being said, it is important to look your best which includes your teeth.  Take care of them and they will take care of you, just don’t get trapped into that obsessive role of whitening.  There is something to be said for getting your teeth toooooo white…oh, so very unnatural.

A few years back we ditched the mouthwash in lieu of peroxide. One reason was because I love it when something pulls double duty (insert frugal gal happy dance here).  We use peroxide to heal cuts & scrapes, as a carpet cleaner/spot remover and peroxide also replaces bleach in our laundry room.

It's rare that we have a product in this house that performs only one function, so when I found out we could add mouthwash to that list, it was a done deal!  Not only is it a great mouthwash, but it whitens your teeth too!

Here are our 5 Easy Steps to Whiten Your Teeth…
  1. Use a 3% hydrogen peroxide solution, which is safe for oral care.
  2. Add about 2 tablespoons peroxide and 1 tablespoon water into a cup and mix.
  3. Pour the combo in your mouth and swish at least 1 minute – You’ll begin to notice some foaming action going on…there’s no cause for alarm. This is normal.  It’s just the peroxide working on the bacteria.
  4. When you’re done swishing, spit out the solution and rinse with water.
  5. Now brush as you normally do.
You can play with the hydrogen peroxide/water combo to fit your needs.  When I first started, my daily swish consisted of 2 tablespoons of peroxide and no water, but it was a bit much for me...low gag tolerance + the taste of peroxide = not a good experience.  I then tried a 1:1 ratio, but now prefer a 2 parts peroxide and 1 part water solution.

You can also add a 3 Step Whitening Brush once a week if needed…
  1. Mix 2 teaspoons peroxide and 3 teaspoons of baking soda until it creates a paste. The measurements don’t have to be exact.  Just find a consistency you like.
  2. Add a small amount to your toothbrush and brush away!
  3. Rinse and then brush your teeth as you normally do.
TIPS:
  • As with anything, use in moderation.  Do the whitening brush no more than once a week and do not use too much as it will damage enamel.
  • This is kinda obvious, but DO NOT swallow or ingest hydrogen peroxide.
  • To whiten a specific spot or more problematic area, use a cotton swab soaked in hydrogen peroxide.
Adding these simple steps to your oral care routine will not only have your choppers gleaming in no time flat, but the whole process is kind on the pocketbook too!  We hope you enjoy (;

In Gratitude,


New to The Homesteading Cottage?   Don't miss a post and subscribe here or type in your email address below for updates delivered straight to your inbox...

Enter your email address to subscribe:


Delivered by FeedBurner

Linking to: Dandelion House, Shabby Nest, Finding Fabulous, Bacon Time with the Hungry Hypo,

Thursday, September 5, 2013

Apple Ginger Lemonade Recipe

On a shopping trip the other day, I happened across a sale on apple juice. Bottled apple juice isn't something I've purchased in while.  In fact I think it's been over 25 yrs, but when you've got a few coupons for organic 100% apple juice and those coupons make that juice free...well, needless to say it goes in the cart (;

Even though it’s not a juice we like to drink, I was sure it would come in handy with other recipes. Little did I know it would be used to create a favorite new drink recipe during a late night fridge plundering episode. Now we can’t get enough of Apple Ginger Lemonade (;

We use lemons and ginger in everything so adding it to the apple juice was a no brainer! It makes the most refreshing, cool blend of flavors to sooth the heat of the ending summer. Here’s the recipe for our yummy concoction…

       ~ crushed ice
       ~ filtered water
       ~ organic 100% apple juice
       ~ fresh ginger root
       ~ lemon wedges

Fill half of your glass with crushed ice and then add half a glass of filtered water. Now grate a nice little pile of fresh ginger on top of the ice water (ginger grates much easier when it's frozen and using a microplane for a fine grate is best so it mixes well).

Next add the juice of 2 lemon wedges (or more depending on your lemon love...2 lemon wedges equals half a small lemon in this house). Top things off with apple juice, filling the rest of the glass. Shake and enjoy!!

It’s great for the digestion, not to mention your immune system and it’s refreshing to boot!!  If you’d like to go even more natural with this drink, here are a couple more options to pack on the nutrition…

       1)  If bottled juice isn't your thing, juice your own fresh apples…skin and all!

       2)  Turn the drink into a smoothie.  Plan ahead and make frozen apple cubes.
            Chop an apple into chunks and place them in a Ziploc bag along with the
            juice of a few lemon wedges (the lemon helps to prevent browning). Then
            pop them in the freezer. Once the apples are completely frozen, place them
            in a blender along with ice, filtered water, ginger root, lemon wedges and
            voilĂ ! Instant Apple Ginger Lemonade Smoothie!!

Foods are healing and it’s so important to have a good portion of raw goodies each day. This drink (or smoothie if you prefer) is the perfect addition to any meal plan.  Here are just some of the healing benefits that these nutrient dense foods offer…

Benefits of apples: full of anti-oxidants, lowers cholesterol, keeps the heart healthy, decreases your risk of diabetes, boosts the immune system, aids in weight loss, reduces the risk of asthma, aids the liver, lowers cholesterol, prevents high blood pressure, staves off Alzheimer’s disease, helps to prevent many types of cancers, promotes hair growth, protects from osteoporosis and may also increase bone density.

Benefits of ginger: has anti-viral, anti-toxic and anti-fungal properties, helps to prevent/treat colds and flu, acts as an antihistamine to sooth allergies, the anti-inflammatory components help to treat muscular disorders caused by inflammation, calms upset stomachs, lowers blood sugar levels, relieves bloating and gas, aids in digestion, lowers cholesterol, prevents the formation of blood clots, can quiet a cough, soothe a sore throat and helps with nausea, seasickness, morning sickness and motion sickness.

Benefits of lemons: antibacterial and anti-viral properties, balances the body’s PH levels, boosts the immune system, helps with weight loss, aids the digestion, is a liver cleanser, helps to fight infection, can be effective in treating acne, eases the symptoms of chills and fevers, can soothe a sore throat and can help to lower high blood pressure.

So give some apples, ginger and lemons a try and quench your summer thirst.  We're sure this new recipe will be a favorite for years to come (;

In Gratitude,


New to The Homesteading Cottage?   Don't miss a post and subscribe here or type in your email address below for updates delivered straight to your inbox...
Enter your email address to subscribe:


Delivered by FeedBurner

Linking up with: My Healthy Green Family, Simple Living and Eating, Finding Fabulous, Bacon Time with the Hungry Hypo, The Grant Life,

Tuesday, October 16, 2012

31 Days :: Prepare for Halloween with Holiday Treats - Day 16

Thank you for visiting The Homesteading Cottage. If you subscribe to our blog via RSS feed or email, you'll get helpful tips on simplicity, organization, all things DIY, natural cooking, entertaining, homesteading and emergency preparedness sent straight to you!

Halloween...that time of year when the gross and the gruesome is happily embraced. I'm sure you've seen those Halloween party platters that resemble body parts or other things that we won't mention (; I've never been one to go that route for our treats...and the only reason? I have a low gag tolerance. Yes, you heard me right...low gag tolerance.

If it remotely looks, sounds, smells or feels like something gross, the heaves begin! I can't even eat and watch TV at the same time if there's a fish/ocean scene because of the texture of the fish...yes, I gag at even the idea of the texture of slimy fish. Sad, huh? So our holiday goodies are all about things natural, fun, delicious and lovely looking (;  Here are a few of our favorite tried and trues...


I hope you'll continue to join us for our 31 Days of Preparation journey. We'll finish things off tomorrow with Halloween favors! Enter your email below and each post will automatically be delivered to your inbox. Don't forget to stop by the many other 31 Dayers for additional inspiration!
Enter your email address:


Delivered by FeedBurner
Ÿ Day 1             Ĺ¸ Day 7             Ĺ¸ Day 12           Ĺ¸ Day 17           Ĺ¸ Day 22           Ĺ¸ Day 27
Ÿ Day 2             Ĺ¸ Day 8             Ĺ¸ Day 13           Ĺ¸ Day 18           Ĺ¸ Day 23           Ĺ¸ Day 28
Ÿ Day 3             Ĺ¸ Day 9             Ĺ¸ Day 14           Ĺ¸ Day 19           Ĺ¸ Day 24           Ĺ¸ Day 29
Ÿ Day 4             Ĺ¸ Day 10           Ĺ¸ Day 15           Ĺ¸ Day 20           Ĺ¸ Day 25           Ĺ¸ Day 30
Ÿ Day 5             Ĺ¸ Day 11           Ĺ¸ Day 16           Ĺ¸ Day 21           Ĺ¸ Day 26           Ĺ¸ Day 31
Ÿ Day 6             Ĺ¸ Day 12           Ĺ¸ Day 18           Ĺ¸ Day 1             Ĺ¸ Day 22            Ĺ¸ Day33

In Gratitude,

New to The Homesteading Cottage?   Don't miss a post and subscribe here...

Wednesday, August 1, 2012

Healthy Oven Fried Okra

Thank you for visiting The Homesteading Cottage. If you subscribe to our blog via RSS feed or email, you'll get helpful tips on simplicity, organization, all things DIY, natural cooking, entertaining, homesteading and emergency preparedness sent straight to you!

Along with french fries, fried okra is a favorite side dish at our homestead. If you've never fried okra in coconut oil, then you're missing something fabulous!! Frying in coconut oil is a great way to have that fried treat, but in a healthy way. Well, one day that okra craving hit and we were out of coconut oil. What to do? Not long ago we learned that baked fries can be awesome and we wondered if there might be a way to get the same great results with baked okra.

After a little online searching, sure enough there is! Here are the steps that have worked the best for us...

Ingredients:
  • 16 oz. bag of frozen okra
  • 2-4 tablespoons of corn meal
  • 1-2 tablespoons of olive oil
  • salt and pepper to taste (we also like a tad of cayenne pepper for a kick)

1. Add one 16 oz. bag of frozen okra to a ziploc bag with few pinches of salt
Let the bag sit for about 10-30 minutes (If you don't have the time to wait, I've let the bag sit for a minimum of 10 minutes with good results). This gives the salt time to extract the juices from the okra.

2. Add 2-4 tablespoons of corn meal, 1-2 tablespoons olive oil and spices of your choosing
Add the olive oil first, then the corn meal with the spices on top. Zip it closed and "flip" the bag over again and again until the okra if fully coated. If you see that the okra isn't coated enough to your liking, then add more cornmeal.

We use 4 tablespoons, but it really just depends on your coating preference. (We also used self-rising corn meal because that's what we had in the pantry. Since salt is already in the self-rising corn meal, we didn't add more during the spice stage. If you're using plain corn meal, then you'll want to add salt to taste).

TIP: Different recipes suggested using oil spray to coat the okra before baking to help create that crispy crust. We don't use canned sprays, but found that adding olive oil in the bag with the cornmeal and spices did the trick!

3. Let the coated okra rest for 10-30 minutes
I usually let it rest for 20 minutes, but have also had great success with a 10 minute set. You just want to give enough time for the juices in the okra and the coating to meld so the coating won't fall off. We used to dip okra in eggs or soaked flaxseed meal before dipping the okra into the corn meal. This new "bag method" saves so much time and you're using less items to make the same great treat!!

4. Pour Okra onto a Baking Sheet
You can grease the sheet if you like, but we never have and the okra comes right off. (Much like our oven baked fries, sometimes the okra may need a little coaxing, but then they pop right up.)

5. Bake at 400° for 30 minutes
After 30 minutes you'll have the most delicious baked okra! It's not as crunchy as okra fried in coconut oil, but it's darn close. We haven't gone back to frying yet!

The summer isn't quite the same without having at least one meal of tomato sandwiches, corn on the cob, fried okra and watermelon. There are those moments when the okra and french fry cravings hit at the same time, so we've been known to bake a pan filled with half fries and half okra! Each recipe calls for the same baking time and temperature so it makes the perfect batch on those days when you just can't decide (; Enjoy!

With Gratitude,

New to The Homesteading Cottage?   Don't miss a post and subscribe here...

Wednesday, July 18, 2012

Tips on Freezing Orange Juice

Thank you for visiting The Homesteading Cottage. If you subscribe to our blog via RSS feed or email, you'll get helpful tips on simplicity, organization, all things DIY, natural cooking, entertaining, homesteading and emergency preparedness sent straight to you!

We love our local grocery store! Not only are the prices great, but they are wonderful about giving free products to returning customers. At the bottom of each receipt we're given a code to use to fill out an online survey about our shopping experience...was the store clean, were we greeted upon entering and leaving, were we able to find what we needed, etc.

With every completed survey, we're given a coupon for free product and this month orange juice was the featured freebie. At the time, this gallon of orange goodness was $4.99 and we were able to collect quite a few coupons. That meant our fridge was filled to the brim with oj in a home where we don't normally drink a lot of the stuff.

Recently in our couponing post, I talked about taking advantage of free product opportunities even if it's not something you use a lot. We love orange juice, but it can be expensive so we focus on water, tea and cranberry juice for most of our drinking needs. We were so excited when the new oj coupons came out, but I knew we couldn't drink the majority of that juice before it expired. The solution? Freezing!

We already freeze broth, veggies, fruit, garlic, herbs and ginger...why not juice?! The neat thing about freezing orange juice in ice cube trays is that the smaller amounts can be used quite easily. Whenever you need juice for a drink, simply place the frozen cubes in a pitcher and the next day you'll have fresh oj for breakfast!

Our favorite thing is to add a few cubes into morning smoothies. It takes the place of ice so the smoothie isn't watered down. Another great idea is to pop several cubes in the food processor or blender along with a tablespoon of olive oil, fresh ginger, fresh garlic, a touch of honey, salt and pepper. It makes an amazing sauce to pour over chicken breasts cooked in the oven. Yum!

For a twist on a healthy summer treat, put popsicle sticks into the cubes when they're almost frozen. Once they're solid, the cubes turn into mini orange popsicles for the kids (the adults in our home love them too!). A simple dessert that's natural and so much better than processed sugar popsicles.

To make our orange juice ice cubes we used 9 ice trays and did the following...

1. Poured orange juice into ice cube trays

2. We left them in the freezer overnight and then dumped the cubes into a glass bowl to make it easier to fill the bags

3. Filled Ziploc bags with oj cubes and stored them in the freezer for future use.

It feels like it's taken forever to freeze all that juice and to be honest, we still have quite a few more gallons waiting to be transformed into little cubes of frozen magic. Just like stocking a healthy pantry, adding to your freezer can be well worth all the hard work for months to come. Keep a look out for a new post on How to Stock a Healthy Freezer soon!

So what goodies are lurking in your freezer? What are your favorite stocked freezer items and how do you freeze them? We'd love to know (;

With Gratitude,

New to The Homesteading Cottage?   Don't miss a post and subscribe here...

Wednesday, July 11, 2012

6 Steps to Make Healthy Oven Baked Fries

Thank you for visiting The Homesteading Cottage. If you subscribe to our blog via RSS feed or email, you'll get helpful tips on simplicity, organization, all things DIY, natural cooking, entertaining, homesteading and emergency preparedness sent straight to you!

Who doesn't love a good french fry? They're a favorite around our Homesteading Cottage and a dish we can eat for almost any meal! I learned how to make fries at a young age and the tastiness factor was so good that it quickly became a constant request from family and friends. Oh, the fun that was had tweaking spices to get just the right melding of flavors. Frying was the chosen method of cooking those lovely golden sticks of deliciousness, but we don't fry so much around here anymore.

Oven baked fries don't seem to have the same crunch that oil frying gives and so french fries have totally dropped off our menu...that is, until now! Recently I noticed several pins floating about here and there regarding the different methods of attaining french fry heaven from the oven. Some were more laborious than others. I'm a simple gal so those in-depth recipe options quickly faded. I finally settled on a combination of Martha Stewart's Italian Fries (minus the cheese and herbs) and several others. Here's my version...

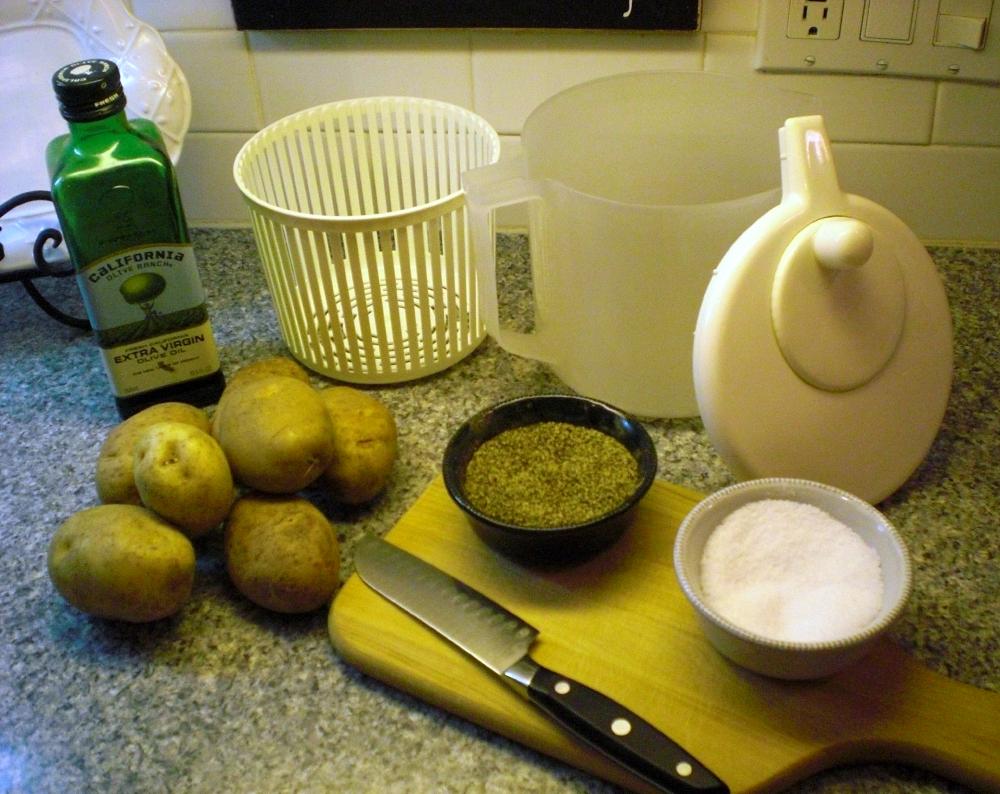
Ingredients:
  • 5-7 large potatoes
  • 2 tablespoons of olive oil
  • salt and pepper to taste

1. Wash Potatoes and Cut into Strips.
I tried several versions...some shoe-string thin and then others on the chunkier side. The thin fries cooked faster than their thicker counterparts.  A few batches were baked with the skins on and others without. Same results...yummy!

2. Soak Cut Fries in Salty, Cold Water.
Once cut, place fries in salted water. This is key. Not only does the salty water add flavor, but it brings out the natural sugars in the potato which help them to crisp during baking. The amount of salt depends on you. I prefer not to add salt to my fries once they're cooked, so I use a good bit in the soaking water...maybe 2-3 teaspoons.

TIP: Some people mentioned letting the cut fries soak for at least 30 minutes or more...I think someone even suggested 1-2 hours! Didn't do that...I'm a bit of an impatient cook (; I just added the potatoes to the water as they were cut and then let them sit for maybe another minute or two more before draining. Sometimes I'd let them sit longer if something else needed tending in the kitchen, otherwise a few minutes of soaking was fine.

3. Drain Potatoes and Spin Dry
Once they're done soaking in the salty water, draining and getting the potatoes dry is very important. If water is left behind, the fries will steam instead of crisping. Most people mentioned spreading out paper towels and dumping the drained fries on so they could be patted dry. Um, did that once...took too long, used too many paper towels and I didn't get all the water off. My solution? Instead of wasting paper towels, dump those wet puppies into a salad spinner!! With a few twirls they're bone dry and ready for the next step! Did I mention I'm all about simplicity (;

4. Add Oil and Spices
Since the salad spinner already needs to be washed, dump out the collected water from the bowl, dry it and then pour the fries back in. No need to wash an additional bowl, eh? Add 1-2 tablespoons of olive oil along with your choice of spices to the dry fries and toss until all are coated (turmeric, garlic, onion powder and pepper is our favorite combo). This particular batch had garlic, onion powder, pepper, chili powder, chives and a tad of turmeric. You'll actually be surprised at the small amount of oil needed to get things covered. One tablespoon was enough for us!

TIP: Some recipes suggested sprinkling spices on the fries once they're spread out on the baking sheet...this is fine, but it just means you'll only have spices on one side. I prefer fries to be coated from top to bottom, so I add the spices along with the oil. Easy steps mean added simplicity.

5. Spread on a Baking Sheet
Spread spiced fries out on a baking sheet...it doesn't matter if they're overlapping or slightly piled on each other. I didn't coat our baking sheet with non-sticking spray as suggested since oil is already coating the fries and they were fine.  Again, simple gal...the fewer steps the better (;

TIP: A few stuck to the pan, but they lifted right off with a little coaxing. Adding parchment paper to your pan to prevent sticking is an option if you prefer.

6. Bake at 400°
Bake at 400° for 30 minutes for shoe-string thin fries or 45 minutes for thicker fries. The time can vary depending on your crisp preference, so just keep an eye out at the 30 minute mark. Once the ends begin to turn golden brown, you'll know they're ready!

TIP: The recipe websites I visited suggested rotating the pan after 30 minutes, but we didn't and they were just fine. We "flipped" the fries with our first few batches...basically that means scooping the fries off the pan and tossing them back on. If the fries seemed done, we'd go ahead and eat. If they needed more cooking (just for the thicker fries), then we'd pop the "flipped fries" back in the oven for a few more minutes.

We've baked fries using this recipe over and over again and they seem to get better with each batch! Add cheese and different spices for a new twist every time. Here are some of our favorite flavor combinations...
  • turmeric, garlic, pepper and onion powder
  • paprika, turmeric, cumin, pepper and cayenne
  • oregano, thyme, marjoram, basil and parmigiano reggiano cheese
  • chili powder, onion powder, garlic and romano cheese

I forgot to take photos of the prepping process for this post so the last two shots don't have chives in the recipe in case you're wondering what happened to the chunks of green in the previous photos (: 

We love making these over and over and hope you do too.  You'll never want to eat greasy fried sticks again when you can bake healthy, crispy goodies!! Have you tried oven baked fries? What were your results? We'd love to know any tips you've learned along the way...

With Gratitude,

New to The Homesteading Cottage?   Don't miss a post and subscribe here...
Related Posts with Thumbnails